Setup your own Security HomeLab - Part 2: Vulnerability Scanning

Vulnerability management is a critical skill in defensive cyber operations. You could easily write a book on Vulnerability and Threat Management, but at the end of the day it can simply be summarised as understanding the risks that software vulnerabilities and system weaknesses create within your environment and managing them. Without knowing how you are vulnerable, what hope do you have at defending against adversaries that would leverage these weaknesses into full blown exploits? It's also one of the few proactive actions that can be done as a cybersecurity professional which directly reduces the likelihood of a compromise. Most processes and systems (SIEM, Honeypots, EDR, IDS,etc) and people process (SOC, IR, Threat-Hunts, etc.) of active defense are reactive, and therefore (arguably) only decrease the severity of the consequences from an cyber security incident.
The first part of this process is to identify the systems on your network, and to scan them to identify useful details (OS, open ports, services, software, etc.) about each system, enter Nmap.
NMAP
While not necessarily an enterprise grade tool, Nmap is the foundation of what many network scanning tools are built on, so having a basic understanding of Nmap is very useful. Nmap's own description is "Nmap uses raw IP packets in novel ways to determine what hosts are available on the network, what services (application name and version) those hosts are offering, what operating systems (and OS versions) they are running..." Nmap is so useful, it's often the first thing taught in network penetration testing. Getting started with Nmap is very easy (especially since it's free and open source) with the official GUI application that shows you what all the various CLI flags do.
So what Nmap gives us is a highly effective and easy to understand network scanner for rapidly enumerating what network ports are open, and often what services are available at those open ports. This is immensely useful for initially understanding your attack surface of a single computer system, or a whole network of various systems. However, it does not tell you the entire story. Nmap can identify the versions of common services - but it lacks the context about those services (known vulnerabilities, insecure protocols, misconfigurations, etc.).
Nessus
This is where Nessus comes into play, being first released in 1998, only one year after Nmap. While Nessus was initially free, it later became commercialised. Nessus is a full blown vulnerability scanning tool, able to scan the network for a vulnerabilities and weakness in a huge range of different devices. It has two different types of operation, credentialed and non-credentialed scans.
Nessus network scans (or sometimes referred to as non-credentialed scans) work very similarly to Nmap in that it scans the network for open ports and attempts to enumerate the service and version at those ports using a range of techniques (often simply by the service advertising its name and version). Then where it differs from Nmap, is that Nessus has a large library of plugins to identify a range of potential security concerns in these exposed services. The problem with this is that these plugins often rely on the information from banner grabbing (the process of capturing software, service and versions advertised on the open port), which may not correctly report if a service is actually vulnerable to a particular vulnerability, depending if certain features are present in the service or if a hotfix may be applied, but not reported in the version number.
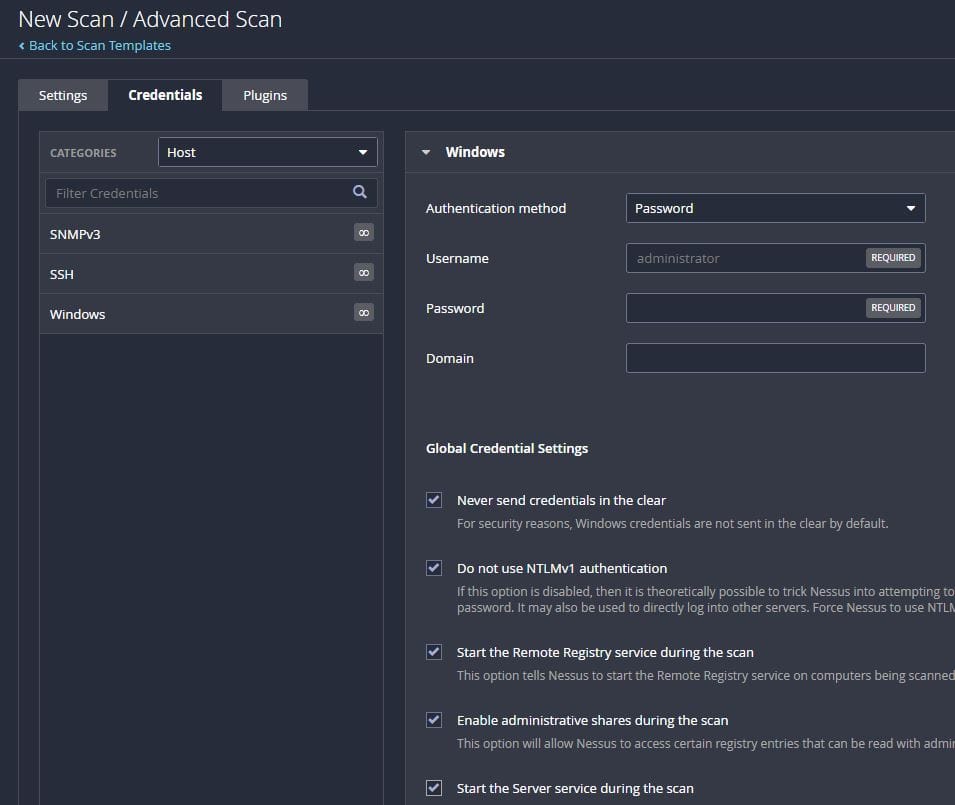
This is where credentialed scans come in to play - they resolve many of the issues of inconclusive or inaccurate network scans. They start with a scan similar to network scanning, however, it will then make use credentials provided to connect to the device on some form on management interface(s) and run commands to further learn more about the system. For Windows, this is a combinations of accessing the administrative shares of the system ($admin, $c, $ipc), Windows Management Instrumentation (WMI), and Remote Registry in order to learn information such as what software is installed, what missing Windows updates exist, registry settings in effect, and if antivirus software is up to date (just to name a few). For Unix type systems (Linux, BSD, etc), this is simpler since Nessus is able to login via SSH and run simple commands. This has some challenges (and risks) since you will need to create an administrator account on all systems that you need to scan (much simpler in an Active Directory environment, of course).
Configuring Nessus in a homelab for some basic testing, and for fun, is fairly trivial. All that you need to do is create a local account on the system(s) you want to scan, give them Admin or root privileges, and input the account details to the Windows and/or Linux credentials when creating a new Advanced or Patch Check scan.
In an enterprise setting, this of course has many issues - local accounts don't scale to tens, hundreds or thousands of machines. Plus, the use of admin accounts is highly inadvisable, since a compromise of this password (or getting the hash) on any one machine may allow a attacker to get local admin on any PC in the domain.
Credentialed Checks on Windows (Tenable Nessus 10.8)User guide for Tenable Nessus 10.8.x.
It's also important to understand the potential security impact of selecting the above options of Start Remote Registry, Enable Administrative Shares, and Start the Server service. The risk of these is very specific to the configuration of your environment, and can be mitigated by using host based firewall rules (pushed via GPOs) to only allow Nessus to connect on these ports.
Fortunately, for homelab use, a fully functional free licence (Nessus Essentials) is available which allows scanning of unique 16 IP addresses every 90 days. The installation options are fairly broad from Windows application, docker container, or pre-built Virtual Machine . My favourite would be to use the docker container or the pre-made VM (Tenable Core + Tenable Nessus).
The instructions on the Tenable Nessus wiki documents both these methods quite well:
Shodan
Shodan is a bit different to the above options, in that it is a cloud service that continually scans the entire IPv4 space on the internet for open ports and does basic service enumeration. It functions as a search engine for exposed services, allowing you to search by IP, organisation, port number, and banner details. This is a service that is equally useful to adversaries, as it is defenders, for rapidly finding systems with specific services exposed on the internet.
It's not free or open source sadly, and for most of the functionality your going to want the basic "Membership" Tier which is a one-time $50 payment, although from time to time they have offered this tier for as low as $5. Plus, if you're a student or have access to a .edu email address you can also gain the same level of access for free.
Once you get access, then configuring up 16 "monitored IPs" is trivial, and will give allow you to configure notifications to be sent to you if a 'verified' vulnerability is detected or a new port is published on a monitored IP. Both of these things are immensely useful, either in a complex homelab (with virtual private servers on the internet) or in an enterprise environment to monitor your external attack surface, for both malicious services and unintentionally exposed services.
Agent based and EDR/XDR tools
This category is too important to not get a mention, but unfortunately the enterprise grade options are not readily accessible for homelab users.
Agent based vulnerability management produces results similar or better then credentialed scans, by having a lightweight agent query the system for installed packages, OS versions, firewall settings, AV definition versions, etc. This is then sent back to a central management console for viewing all systems in aggregate. When managing a large corporate enterprise environment, this method can work far better for transient end user devices that may be offline, on Wi-Fi, or at home. Since unlike a network scanning, the agent can work asynchronously from the management and just upload the info when it next checks-in with the management console.
Tenable provide an agent that can work together with traditional network based vulnerability scanning, to present both results in one tool. Unfortunately, there is no free or homelab friendly priced way of setting this up (except the very short 7 day trial).
Some of the Endpoint Detection and Response (EDR) also have this functionality built into them. Tools such as CrowdStrike Falcon, SentinelOne, Microsoft Defender for Endpoint, and Sophos Intercept X, to name a few. This approach of doing vulnerability management within an EDR agent becomes very favourable at scale because it cuts down the number of security agents that need to be installed (and maintained!) across the fleet of endpoints and servers in the various networks across the environment, plus will often give additional security information beyond what a vulnerability scanner will find.
Summary
At the end of the day, all of the above methods are useful and play a different important role in understanding how and where your systems have exposed software vulnerabilities and give you an understanding of your risk exposure. In a big enterprise you will want to use multiple methods, either to deal with systems where you cannot install security agents (due to age or vendor support contracts), or to use both an agent and authenticated vulnerability scans in order to cross-reference results and ensure that you have a complete and accurate picture of your environment - and therefore your risk.